Gravity PDF Settings and What They Do
Gravity PDF is fully integrated into Gravity Forms. The PDF settings are located in a separate section in Gravity Forms own settings area. You can find it by navigating to Forms -> Settings -> PDF in your WordPress admin area. The PDF settings are split into three separate tabs out of the box, and two additional tabs if you purchase and install an extension.
General Tab
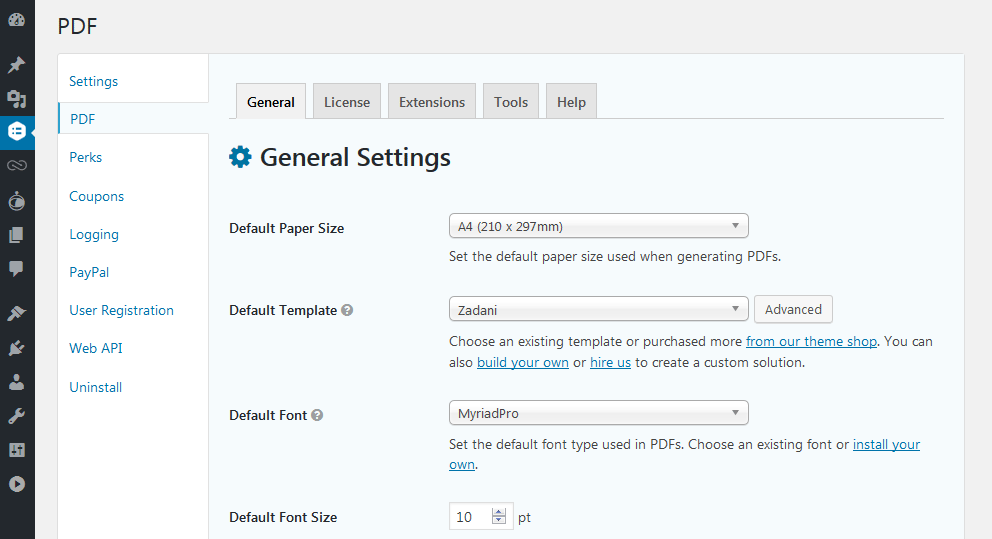
From here you'll be able to control the PDF defaults like paper size, font and template. You also have advanced options giving you granular control over the security protocols. This tab is only available to users with the gravityforms_view_settings capability. By default, this is administrators and network super admins (if running a multisite). Below is the list of settings available in the General tab, with a brief description about what each is for.
Default Paper Size
- Use this option to set the paper size for all individual PDFs. The default selection is A4 (210 x 297mm), but other common paper sizes such as US Letter and Legal are easily accessible. Also preloaded are the ISO-standard A, B and C paper sizes, as well as RA and SRA.
- If none of the preloaded options suit, you can also select Custom Paper Size and control the width and height in millimetres or inches.
Custom Paper Size
- This field is hidden until you select the Custom Template Option from the Default Paper Size field. It allows you to control the exact paper size of your document – in millimetres or inches. When displayed, this field is required and only positive numbers are permitted in the width and height inputs.
Default Template
- Use this option to set the default template for all individual PDFs (templates control the PDF design and layout). Gravity PDF comes with four completely-free templates for you to choose from. Click the
Advancedbutton to view a preview of all available designs. - The default template is Zadani – a minimalist business-style template that will generate a well-spaced document great for printing. Additional templates can be purchased from our template shop and installed through our PDF Template Manager.
- Developers with HTML, CSS and PHP knowledge can create their own designs and layouts. Alternatively, the Gravity PDF team offers design and integration services for those looking for a custom solution – we can even integrate existing PDF documents.
Default Font Type
- Use this option to set the default font for all individual PDFs. Gravity PDF ships with fonts for the majority of languages worldwide and uses the unicode typeface DejaVu Sans Condensed by default. For languages that aren't supported out of the box, you can use our Font Installer to upload TTF or OTF font files for use in PDFs.
Default Font Size
- Use this option to set the default font size for all individual PDFs. The default is set to 10pt. Increase or decrease to suit your font type.
Default Font Colour
- Use this option to set the default font colour for all individual PDFs. The default is set to black (hex colour code #000000).
Reverse Text (RTL)
- Use this option to default the text direction for all individual PDFs. Many languages worldwide are written from right to left – Arabic and Hebrew script are examples of this. The default is set to No, with RTL support disabled.
Entry View
- This option determines if the PDF on your admin entry list/detail pages will be shown in your browser or a download prompt should be shown. By default, this option is set to
View.
Background Processing
- When enable, during form submission and resending notifications PDFs will be processed and emailed in a background task. This is very useful if you've complex PDFs, have multiple PDFs assigned to a form, want to speed up the submission process, or are resending notifications in bulk.
- When enabled, Gravity Forms Notifications configured to be sent during Form Submission with PDFs attached will be delayed and processed in the background process/task.
- This functionality requires Background tasks and the WordPress Cron are functional. Find out more about Background Processing and its requirements.
- By default this option is set to
No.
Debug Mode
- When enabled, this turns on shortcode debugging and PDF statistics, turns off template header caching, and turns on the helper parameters.
- Shortcode debugging: when Debug Mode is on, users with the
gravityforms_view_entriescapability (the Administrator Role by default) will be shown debug messages when the [gravitypdf] shortcode cannot be generated. When Debug Mode is off and a shortcode error occurs, no content is shown. - PDF statistics: when Debug Mode is on the PDF will display the time spent generating the document, peak memory usage, and number of fonts used.
- Template header caching: to decrease the plugin initialisation time, we store the template header data in a transient (expires weekly) instead of reading that information from the filesystem. The cache is flushed automatically when installing or deleting a template via the PDF Template Manager, or when toggling Debug Mode. The cache is disabled when Debug Mode is on.
- Replaces Shortcode Debug Message setting in Gravity PDF 5.1
- Helper Parameters: The developer PDF helper parameters
?html=1and?data=1are enabled on a production website for users with thegravityforms_edit_formscapability - By default, this option is set to
No.
Shortcode Debug Message
- When enabled, users with the
gravityforms_view_entriescapability (the Administrator Role by default) will be shown debug messages when the [gravitypdf] shortcode cannot be generated. - When disabled and an error occurs processing the [gravitypdf] shortcode, no content is shown.
- By default, this option is set to
Disable. - This setting was replaced by Debug Mode in Gravity PDF 5.1
Advanced Options

The advanced options focus on PDF security and can be shown by clicking the Show Advanced Options... link (just above the Save Changes button). The security settings are configured with sane defaults and, in most cases, you won't need to modify this behaviour. Our security documentation page focuses on the finer points of the plugin's security protocols and is worth a read before changing these options.
User Restriction
- Logged in users who do not have the
gravityforms_view_entriescapability are prevented from accessing any PDF if they aren't the original owner – the owner is who filled in the form entry originally. If you leave the setting untouched only site administrators and network super admins (if running a multisite) can view the generated PDFs. To change this behaviour, you can assign capabilities that other roles have access to. For instance, if you wanted the Editor role to have access to PDFs, you could add theedit_pagescapability. Alternatively, instead of adding additional capabilities to this field, you could use a role editing plugin like User Role Editor to give an existing role thegravityforms_view_entriescapability. Choose the best solution for your use-case. - This option has no effect on PDFs sent as attachments in Gravity Form notifications but does effect the
[gravitypdf]shortcode and PDF merge tags. - More information about WordPress roles and capabilities can be found in the WordPress codex.
Default Owner Restrictions
- This option allows you to prevent the form entry owner – the user who filled out the Gravity Form – from viewing the generated PDF. This included logged out and logged in users – with the exception of a logged in user who has any of the capabilities listed in the User Restriction field.
- This option has no effect on PDFs sent as attachments in Gravity Form notifications but does effect the
[gravitypdf]shortcode and PDF merge tags. - The default option is
No.
Logged Out Timeout
- When a logged out user attempts to view a PDF, the plugin will try and match their current IP address against the one saved with the Gravity Forms entry. If they match, they get access. However, this method isn't a secure long-term option because IP addresses can change. To prevent unauthorised access, we implemented a timeout feature. After X amount of time, the user no longer has access to the generated PDF.
- This option has no effect on PDFs sent as attachments in Gravity Form notifications but does effect the
[gravitypdf]shortcode and PDF merge tags. - By default, this timeout is set to 20 minutes. While it is not recommended, you can disable the timeout functionality by setting the value to zero (0).
License Tab

If you've purchased an extension from our store and have it activated on your website, a new License tab will be available. This tab allows you to enter and activate your license key to receive automatic plugin updates.
Extensions Tab
This tab will appear if you've purchased and activated a Gravity PDF extension that has global settings. The extension settings will be made available from this tab. You should consult the add-on documentation on whether any global settings exist.
Tools Tab

The tools tab contains useful functions for power users. You can install the core PDF fonts, any additional fonts for use in your PDF documents, prepare your system for custom PDF templates and uninstall the plugin. This tab is only available to users with the gravityforms_edit_settings capability. By default, this is administrators and network super admins (if running a multisite). Below is the list of settings available in the Tools tab, with a brief description about what each is for.
Setup Custom Templates
- Gravity PDF uses a templating system similar to WordPress' child themes. The core templates that ship with the plugin are located in the
/src/templates/directory (it acts like a parent theme). However, you cannot modify these files without losing your changes when the plugin is updated. To circumvent this issue, templates can be placed in the plugin's working directory/wp-content/uploads/PDF_EXTENDED_TEMPLATES/(the child theme in our analogy). From here you can edit the templates as you see fit and you won't lose your modifications during updates. - The Setup Custom Templates option copies all the core templates to the PDF Working Directory. If you have previously run this setup, the core files in this directory will be overridden.
- Before running this function, it's recommended that you review our developer's guide to templating.
Fonts
-
The font manager allows you to install any TTF font and use it in your PDFs. There are two required fields when adding a new font:
- Unique font name (only alphanumeric characters and spaces must be used)
- The URL to the font file (fonts must be uploaded via the Media Library and in TTF format)
If the particular font provides different files for bold, italic and bold-italic typefaces, you can optionally include them. A faux bold, italic or bold italic style will be rendered in the PDF if they are not set.
-
Once a font is installed, you can select it in the PDF settings. If creating a PDF template you also have the option to set the font family directly using CSS (a helpful snippet is provided).
-
Review our Font Manager documentation for more in-depth details on managing PDF fonts.
Install Core Fonts
- Will install the Core PDF fonts needed to correctly generated PDF documents with Gravity PDF.
- Can also be used to re-install Core PDF fonts if a font problem occurs.

Uninstall
- This option will completely remove the plugin from your website and clean up the database and file system – it will be as if the software was never installed. Any custom templates you have will also be deleted. During the uninstallation, the plugin will automatically deactivate and redirect you to the plugins page.
- When the uninstall button is clicked, a warning box will pop up asking you to confirm before continuing.
- A user must have the
gravityforms_uninstallcapability to complete this action. By default, this is only site administrators. If running a multisite, only a network super admin can do the uninstallation.
Help Tab

If you've got a problem with Gravity PDF, or aren't sure how to accomplish a task, the Help tab is here to... well, help! You can search our documentation straight from your admin area, directly access some of the more common tasks and get access to our support team.