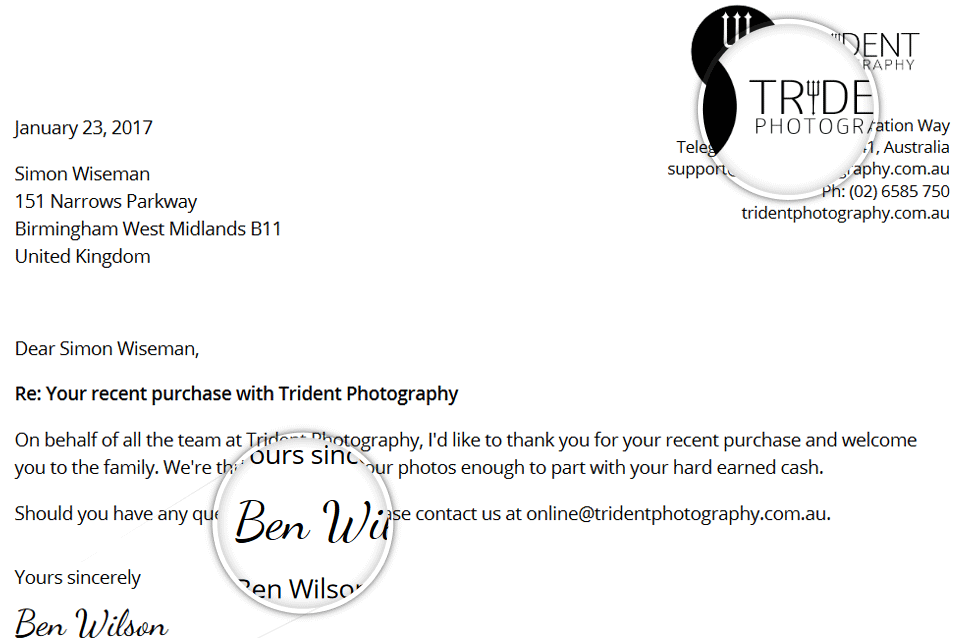
Business Letter #2 Template: How to Install and Configure
 The Business Letter #2 premium PDF template is a modern take on the formal business letter. It can be purchased from our PDF Template Shop. This guide will walk you through installing and configuring Business Letter #2 to its full potential.
Installation
Please follow our installation guide, which provides instructions for setting up and configuring your premium template.
Limitations
Business Letter #2 can be used with all Gravity Forms. You'll have access to your form data for use in the letter through Gravity Forms Merge Tags. For more information, see the Gravity Forms Merge Tags documentation.
Configuring
All PDF templates have common settings that can be configured, such as font, security and PDF attachments, and we recommend reviewing the PDF setup guide to get a better understanding on all the available settings. All template-specific configuration is done from the Template section, and below you'll find detailed information about each option available in Business Letter #2, what it does and how it alters the generated PDF.
Standard Information

Greeting Salutation (1)
- The opening greeting for your letter. If you've set the Recipient's Name the following Merge Tags are available for use:
{prefix},{firstname},{surname},{suffix}. - Instead of using the recipient's full name, you can also use
Dear {prefix} {surname}. - If you don't know the recipient's name use
To whom it may concernorDear Sir or Madam. - Note: American English usually uses a colon instead of a comma at the end of the greeting.
Letter Subject (2)
- Include a brief summary about your letter. The Subject will be included below your Greeting Salutation and above your Letter Body.
- You might like to append your subject with "Re:" or "Subject:" and/or write it in capital letters.
- If you leave this setting blank, it won't be included in the PDF.
Letter Body (3)
- The main body of your letter. Use the full-featured rich text editor to format the letter how you want. You can easily integrate data captured from your users by using Merge Tags.
- You should exclude salutations, addresses and signatures as they are handled by other settings.
Closing Salutation (4)
- This text appears right after the body of your letter.
Yours sincerelyis a common closing salutation. Outside the US, if you don't know the recipient's nameYours, faithfullyshould be used.
Date Format (5)
- Select the date format that is shown in the letter. The date shown on the PDF is taken from the entry submission date.
- We support date formats out of the box:
- November 29, 2018 (Month Day, Year)
- 29/11/2018 (dd/mm/yyyy)
- 11/29/2018 (mm/dd/yyyy)
- 2018-11-29 (yyyy-mm-dd)
- Disable Date
Indent Paragraphs
- When checked the first line of each paragraph of the Body text is indented.

Business Information

Business Logo (6)
- Upload your company / business logo for inclusion in the letter.
- An image 500px wide will be a suitable resolution in most cases. To ensure your PDF generates quickly and the PDF file size stays small, we recommend using an image under 1MB.
Business Address (7)
- The business / sender address is split into three separate fields for each line it takes up in the letter.
- You are usually the sender, and your address should be used, but you can also use Merge Tags to include that information from the form.
Business Contact Info (8)
- The business / sender contact information is split into two separate fields for each line it takes up in the letter.
- Include your company / business email, phone or fax.
Business Website (9)
- Include your company / business website address
Recipient Information

Recipient Name (10)
- Use Gravity Forms merge tags to include the letter recipient's name. In the settings, this is split up between four fields: Prefix, First Name, Last Name and Suffix.
Recipient Business/Position (11)
- If applicable, include the recipient business and/or position in the company using Merge Tags.
Recipient Address (12)
- The recipient address is split into three separate fields for each line it takes up in the letter.
Signatory Details

Blank Signature (13)
- Tick this checkbox if the letter is to be printed and signed by hand. The PDF will leave a gap between the Closing Salutation and the Signatory Name.
Signature (13)
- Upload an image of your signature. If no image is set, a faux signature will be used instead, generated using the Signatory Name.
- This template comes bundled with Dancing Script, an open source Google script font (SIL Open Font License, Version 1.1), used for the faux signature.
Signatory Name (14)
- The full name of the signatory (i.e the person who is signing the letter)
Signatory Business/Position (15)
- You can include the signatory's business and/or position. This is optional.
Extras

Carbon Copy (16)
- Additional names you intend to send the letter to. This is included at the bottom of the letter.
Carbon Copy Label (17)
- The label used in the letter for Carbon Copy.
Recommended Fonts
Open Sans is an open source font (Apache License, Version 2.0) that's optimised for print, web, and mobile interfaces. It works well with Business Letter #2 at 10pt. You can set the PDF font in the Appearance section.
Viewing PDF
Once you've saved your new PDF, you can view it from the Gravity Forms Entries List page.